
When a heavy storm rolls through, your roof takes the full impact. High winds, driving rain, and flying debris can cause damage that isn’t always visible right away. Even a few missing shingles or a loose gutter can lead to leaks, rot, and costly repairs if left unchecked.
That is why a post-storm roof inspection is one of the most important things a homeowner can do. A quick visual check can reveal immediate problems, but a careful, step-by-step evaluation ensures that small issues do not turn into major damage.
At Guardian Roofing, Gutters & Insulation, we help homeowners protect their investment by identifying roof damage early and restoring safety after every storm. With a clear inspection plan and professional follow-up, you can keep your roof strong, your home dry, and your family safe.
Why Storms Cause More Roof Damage Than You Think
Even a mild storm can leave behind damage that most homeowners never notice. Strong winds can lift shingles just enough to break their seal, allowing water to seep underneath. Heavy rain can overwhelm gutters, forcing water to back up beneath the roofing materials. Flying debris, such as branches or loose outdoor items, can strike the roof and cause cracks or punctures that lead to long-term leaks.
The real danger lies in the damage you cannot see. Once moisture penetrates the surface, it can soak into the underlayment or insulation. Over time, this hidden moisture weakens the roof deck and promotes mold growth in attic spaces. What starts as a small leak can turn into widespread structural damage if not caught early.
Because most storm-related issues begin small, regular inspections after wind or rain events are essential. Identifying and repairing minor problems now can prevent major repair costs later and help your roof withstand future storms with confidence.
Step 1: Inspect from the Ground First
After a heavy storm, safety should always come first. Avoid climbing onto the roof until you are certain it is stable and dry. Instead, start your inspection from the ground using a pair of binoculars or a camera with a zoom lens. This approach allows you to spot visible damage safely and document anything that looks out of place.
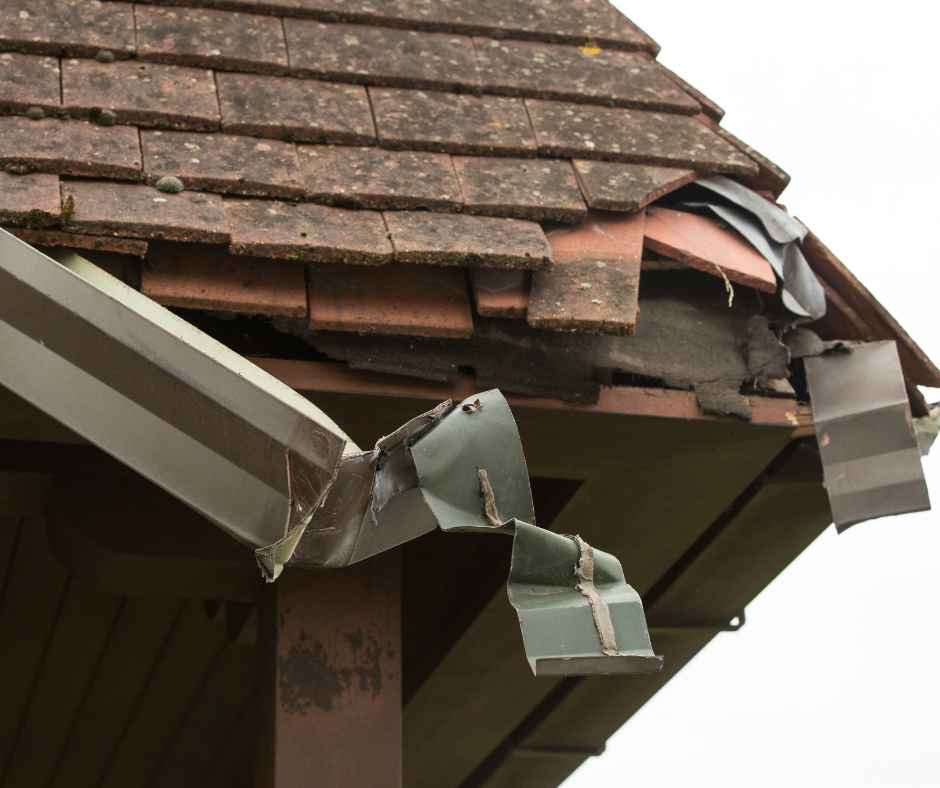
Look for missing or curled shingles, dark patches, or exposed areas where the roof covering may have been lifted. Check for fallen debris, such as branches or loose materials, that could have caused impact damage. Pay close attention to flashing around chimneys, vents, and skylights, as these are common spots for leaks to begin.
Walk around the entire home to get a full view of the roof from every angle. Take note of any bent or detached gutters, sagging downspouts, or areas where water seems to be pooling. These details will help guide the next steps in your inspection and make it easier to explain potential issues to a roofing professional later on.
Step 2: Check the Attic and Ceilings for Leaks
Once you have completed your outdoor inspection, the next step is to look inside. The attic often provides the first signs of hidden roof damage because moisture seeps downward from the roof deck. Even if you do not see visible leaks, small warning signs can reveal a problem long before it spreads.
Use a flashlight to carefully inspect the underside of your roof. Look for dark stains, damp insulation, or wood that feels soft to the touch. Any discoloration or musty odor can signal that water is entering through damaged shingles or flashing. If you notice sunlight shining through gaps or seams, that also indicates that the roof may no longer be sealed properly.
Next, check your ceilings and upper walls inside the home. Water stains, bubbling paint, or sagging drywall are clear indicators of roof leaks. Addressing these issues quickly can prevent structural damage and protect your insulation from mold and mildew growth.
A careful attic inspection helps you catch roof leaks early and gives you valuable information to share with a professional roofing contractor during a full post-storm evaluation.
Step 3: Examine Gutters and Downspouts
Your gutter system plays a major role in protecting your roof and home from water damage. After a storm, gutters and downspouts are often the first parts of your roofing system to show signs of stress. Checking them right away helps prevent future leaks and foundation issues.
Start by looking for sagging or detached gutters that may have pulled away from the roofline. Heavy rain and wind can loosen fasteners or bend metal sections, allowing water to flow where it should not. Clear away any visible debris, such as leaves, twigs, or shingle granules, that could block water flow. Clogged gutters cause water to overflow and soak into fascia boards or the roof edge, leading to rot over time.
Next, check that downspouts are securely attached and direct water several feet away from your home’s foundation. Pooling water near the base of your home can create serious structural issues and lead to basement leaks.
If you notice cracks, rust spots, or leaking joints, take photos and include them in your inspection notes. These small signs of damage can quickly escalate if left untreated. Keeping your gutters clear and functioning ensures that your roof drainage system can handle the next storm safely and efficiently.
Step 4: Look for Interior Warning Signs
Not all roof damage shows up outside. Sometimes the first evidence appears inside your home, long after the storm has passed. By paying attention to subtle changes indoors, you can often catch roof leaks and moisture problems before they turn into serious structural damage.
Walk through every room on the upper floor of your home and look for peeling paint, discolored ceilings, or warped walls. Water stains that spread slowly over time are a clear sign that your roof may be letting in moisture. Check corners, window frames, and ceiling fixtures, as water often travels along beams and settles in these hidden areas.
If your home suddenly feels more humid or you notice a musty odor, moisture could be trapped within the insulation or behind drywall. These signs indicate a potential leak in the roofing system or around attic vents and flashing.
Addressing interior warning signs early not only protects your roof but also helps prevent mold growth and preserves indoor air quality. Once you have completed this inspection, you will have a better understanding of whether it is time to call in a professional for a full evaluation.
Step 5: Schedule a Professional Roof Inspection
Even the most careful homeowner can only see part of the picture after a storm. A professional roof inspection goes beyond what is visible from the ground or attic and identifies damage that could easily be missed. Expert roofing technicians have the training and technology to assess every layer of your roof and provide a clear, accurate report.
At Guardian Roofing, Gutters & Insulation, our team uses specialized tools such as moisture sensors, infrared cameras, and drone imaging to uncover hidden issues. These methods detect problems like trapped water, lifted flashing, and structural weakness that can lead to leaks or early roof failure.
A detailed inspection also helps with insurance claims. If your roof has sustained storm-related damage, a professional assessment provides the documentation needed to support your claim and ensure repairs are covered properly.
By scheduling a professional inspection soon after a heavy wind or rain event, you protect your home from long-term damage and gain peace of mind knowing your roof is safe, secure, and ready for the next storm.
Preventive Tips to Keep Your Roof Storm-Ready
The best way to protect your home from future storm damage is through regular maintenance and preparation. A few simple steps each season can make a big difference in how your roof handles wind, rain, and debris.
Start by trimming overhanging tree branches that could break during a storm. Falling limbs are one of the most common causes of roof punctures and shingle damage. Keep your gutters and downspouts clean year-round so water can flow freely away from your home. Blocked drainage systems often lead to leaks along the roof edge and fascia.
Inspect your attic ventilation and insulation at least once a year. Proper airflow prevents heat and moisture buildup, which can weaken roofing materials and reduce energy efficiency. Replace damaged shingles, cracked flashing, or loose sealant as soon as they are discovered to keep your roof watertight.
Finally, schedule a professional roof inspection before storm season begins. A qualified roofing expert can identify weak spots, recommend repairs, and ensure your home is ready for whatever the weather brings. Preventive care now can save thousands in repairs later and keep your home safe through every season.
Protect Your Home with Guardian Roofing
After every major storm, a careful inspection can make all the difference between a quick repair and a costly replacement. Wind and rain may seem harmless once the skies clear, but even minor damage can grow quickly if it goes unnoticed. Taking the time to check your roof, gutters, and attic helps protect your home’s structure and keeps your family safe.
If you suspect storm damage or simply want professional peace of mind, Guardian Roofing, Gutters & Insulation is here to help. Our experts use advanced inspection tools to identify hidden issues, provide honest assessments, and guide you through the next steps for repair or maintenance.
Do not wait until small problems turn into major leaks. Schedule your post-storm roof inspection with Guardian today and make sure your home is protected from the top down.
Frequently Asked Questions About Post-Storm Roof Inspections
How soon should I inspect my roof after a storm?
It’s best to inspect your roof within 24 to 48 hours after a major storm. Quick inspections help identify damage before rain or wind cause it to worsen. If conditions are unsafe, wait for clear weather or contact a professional for an immediate assessment.
Can I walk on my roof to check for damage?
It’s never recommended to walk on your roof after a storm. Wet surfaces and loose shingles can create dangerous conditions. Inspect from the ground or use binoculars, and let a certified roofing professional handle the close-up evaluation.
What are the most common signs of storm damage on a roof?
Typical signs include missing shingles, dented flashing, cracked sealant, sagging gutters, and dark water stains on ceilings or attic boards. You may also notice an increase in indoor humidity or musty smells, which indicate trapped moisture.
Will my homeowners insurance cover storm-related roof repairs?
In many cases, yes. Most insurance policies cover storm damage caused by wind, hail, or heavy rain. However, coverage may depend on the cause, extent of the damage, and how promptly it is reported. A professional inspection provides the documentation needed for a smooth claims process.
How often should I schedule professional roof maintenance?
Experts recommend a professional roof inspection at least once a year and after any severe storm. Routine maintenance ensures that minor issues are repaired before they become costly problems and helps extend the lifespan of your roof.